Container Control
When containers are used, you may add inventory to a container or a location, view inventory for containers and locations, and move inventory from containers and locations. This functionality is via the container control, which is found in the Location field. When your system uses containers, the container control is found in the Location field in the following places:
|
Form Name |
|---|
|
Add Assets form |
|
Add Item to Inventory form |
|
Assets form |
|
Check In page |
|
Container Move page |
|
Inventory Data page |
|
Mass Move Assets page |
|
Mass Move page |
|
Receipt page |
|
Receive Inventory form |
|
Return page |
|
Single Asset Move page |
|
Single Move page |
When you click the Filter icon , you are able to select what to include in the Location drop-down list.
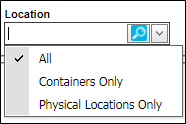
- All: include both locations and containers in the drop-down list.
- Containers Only: include only containers in the drop-down list.
- Physical Locations Only: include only locations in the drop-down list.
Adding a New Container from the Location Field
If the Location field also contains an Add icon, you are also able to add a new container to the application from the container control.

- To add a new location, click the Add icon
 in the Location field.
 - The Add Container form appears.

- Add the new container from this form.
- Name field (required): enter the name for the container.
- Description field (optional): enter a description for the container.
- Container Type field (required): click the drop-down arrow and select the container type from the list that appears.
- Site field (required): the default site of the logged-in user is automatically placed in this field. If the logged-in user has access to another site or sites, this site may be selected for the container site.
- Location field (required): click the drop-down arrow and select the physical location in which the container will reside.
- Quarantined checkbox: when marked the container is placed into inactive status and no operations may be performed on it. When adding a container, do not mark this checkbox if you want to use the container.
- Length, Width, Height, Weight fields (optional): Record container dimensions along with dimension units in these fields.
- When you click the Save icon
 , the form closes and you are returned to the page.
 - Click the drop-down arrow in the Location field. The new container is now part of the list (if containers are included in the filter selection).